DIY & Crafts
Vertical Wood Slat Wall DIY, Step by Step

Quick Answer
A vertical wood slat wall is made from 1x2 boards stained and nailed to two horizontal support boards, then mounted to the wall with screws or renter-friendly Velcro. You can build one in about two hours for a fraction of the cost of pre-made panels — no special tools beyond a saw, a hammer, and a tape measure.
Over the last several months I’ve been updating our entryway, and I finally finished the entry nook! You’d be surprised just how simple this wood slat DIY is.
From start to finish (not including drying time for the stain) it took about two hours, and you won’t need a lot of material. It’s the same warm, organic look you’ve seen in our favorite accent wall ideas — just the budget, from-scratch version, no pre-made panels required.
Below is everything you’ll need, the little bit of math that makes it foolproof, and the exact spacing trick that keeps every slat perfectly even.
What is a vertical wood slat wall?
A vertical wood slat wall is an accent wall built from evenly spaced strips of wood — usually 1x2 boards — run vertically against a contrasting backing. The vertical lines draw the eye upward, which makes ceilings feel taller and a small space feel grander, so it’s a favorite trick for entryways, bedrooms, and nooks like ours.
Here’s the nook before, so you can see exactly what we started with — a blank builder-grade corner with a single hook rack:

What materials do you need for a wood slat wall?
This is a genuinely short supply list — most of the cost is in the boards themselves. Here’s everything I used for this vertical wall slat project:
Materials
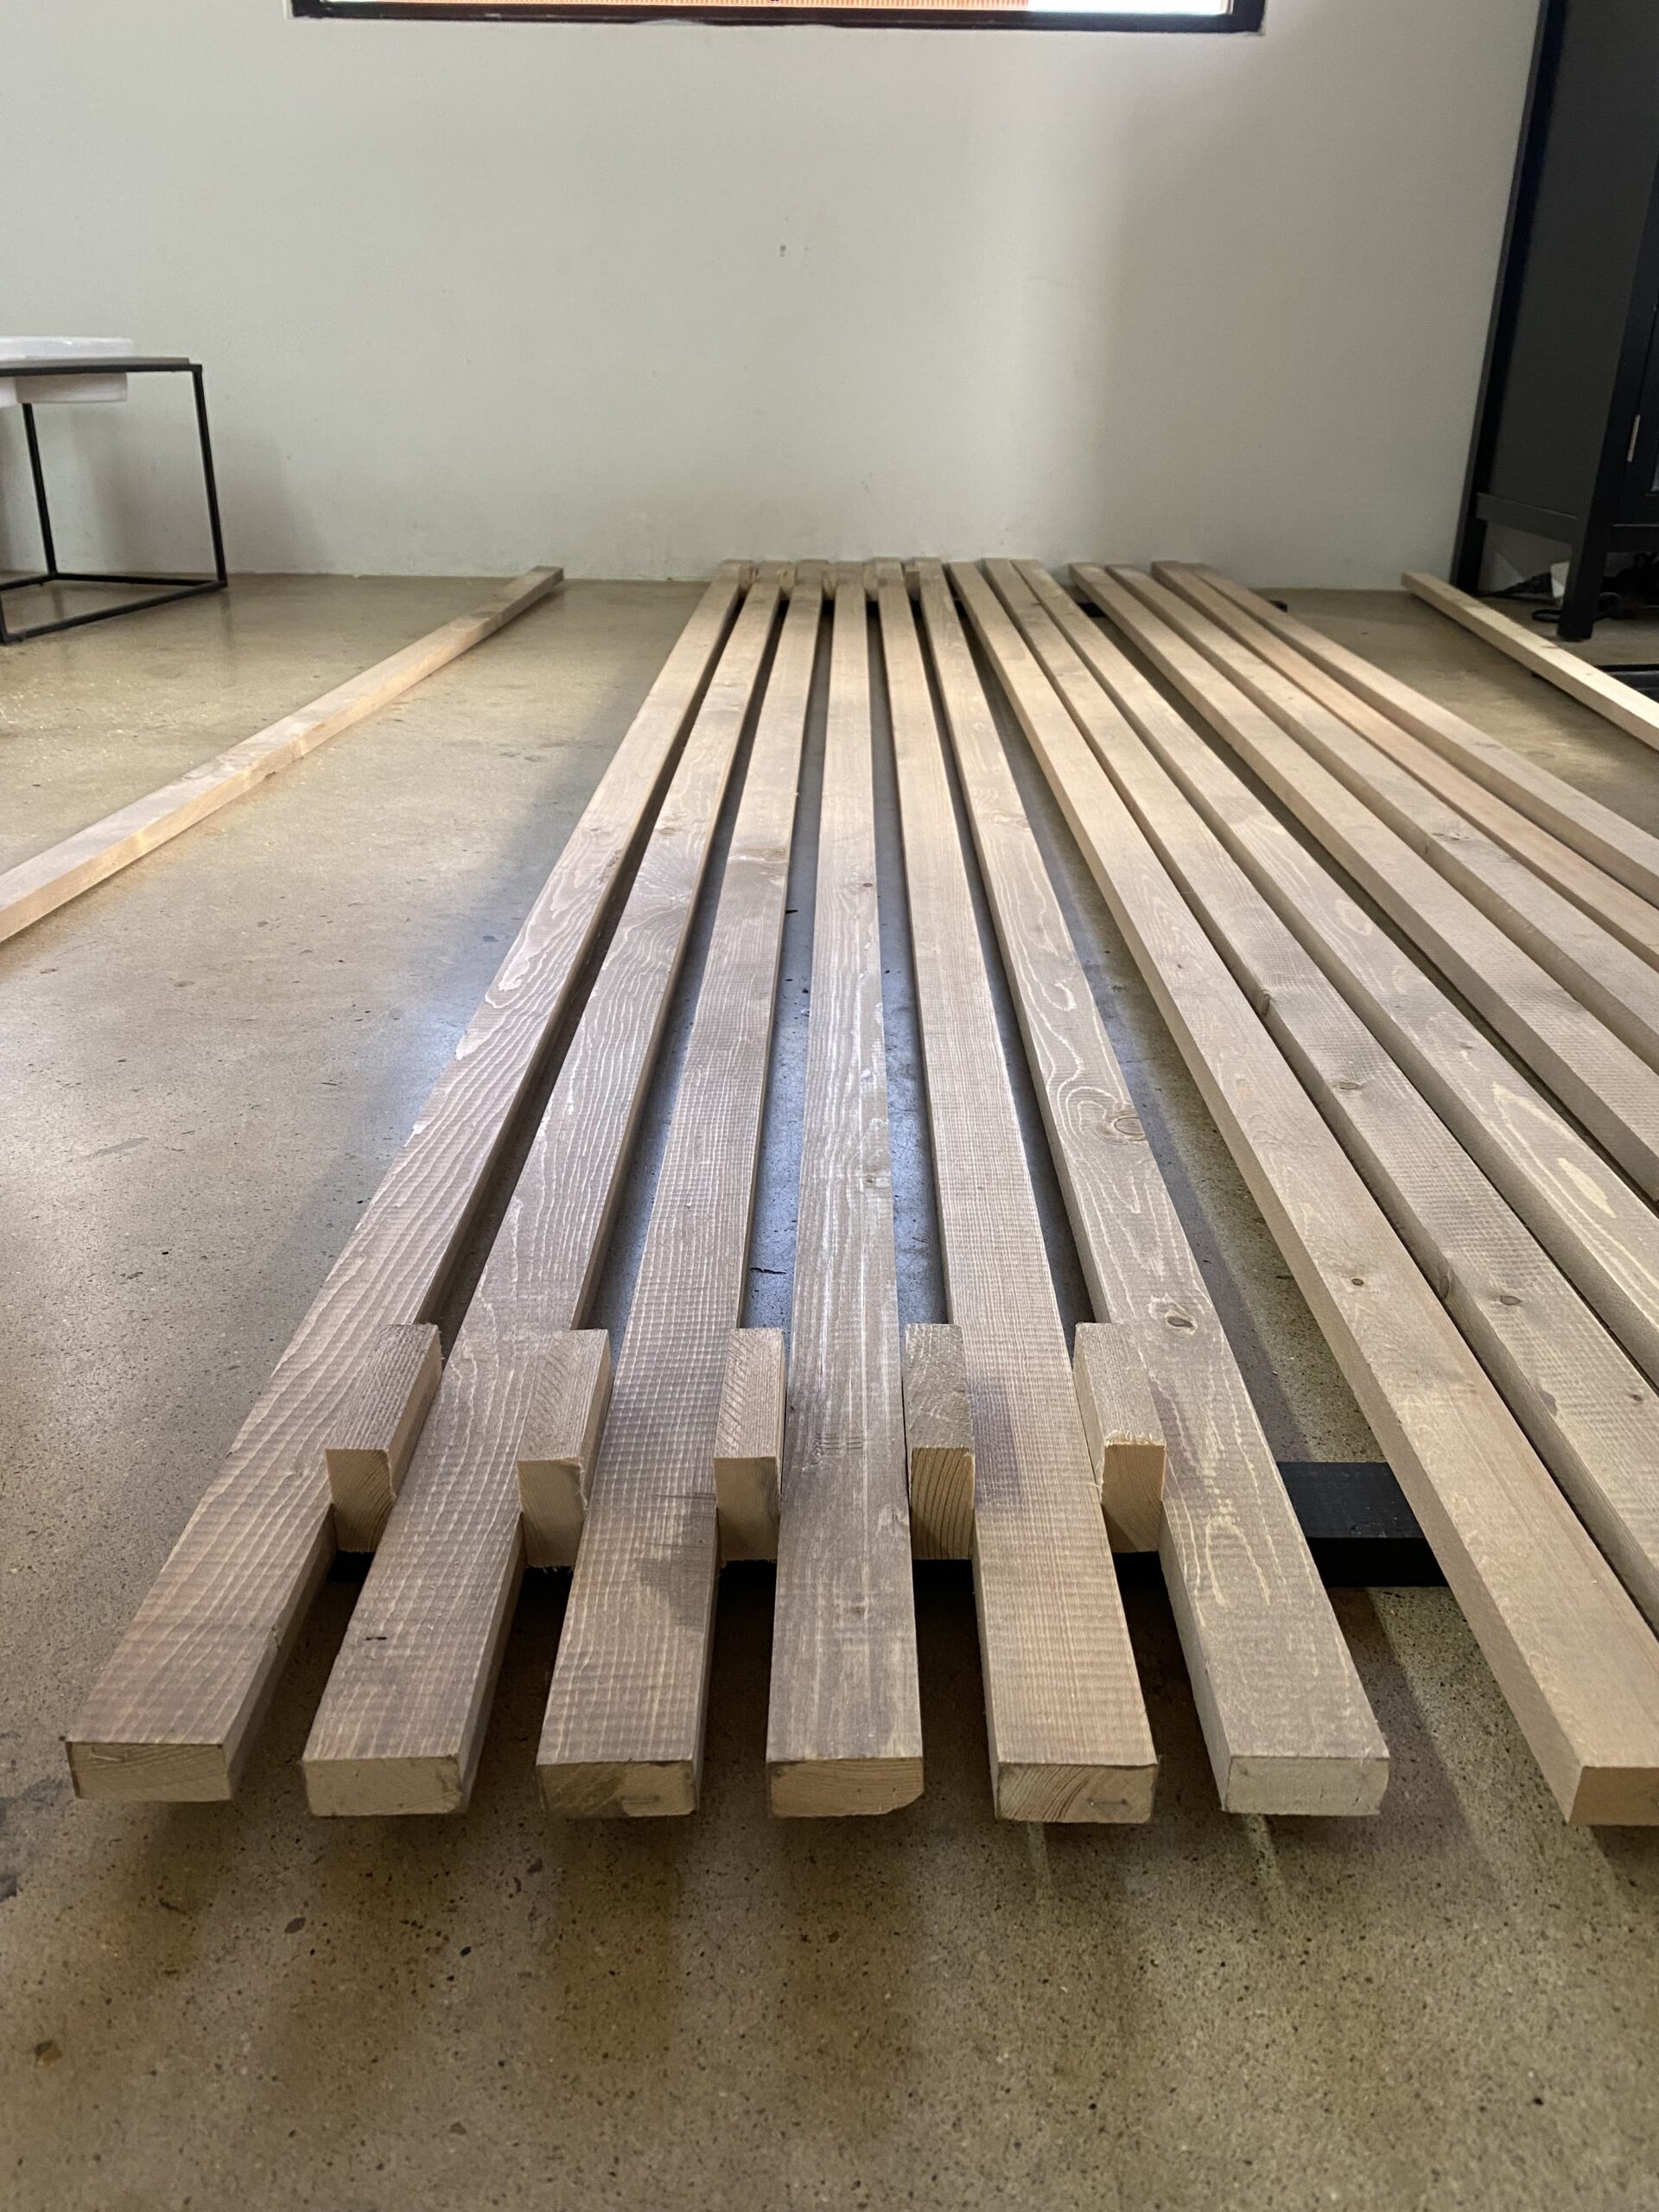
- 1x2s — For this project, I used 1″x2″x8′ common boards. The number of 1x2s you’ll need will depend on the width of your wall. These particular boards are 8 feet tall, so you may need to cut them to size depending on the height of your wall. If you trim off excess pieces, be sure to keep them to use as your spacers. If you need to cut them yourself and don’t have a chop saw, I recommend using a small circular saw from Amazon.
- Wood stain — Color of your choice, but I used Flagstone.
- Thin penny nails — I use these ones since they are really subtle.
- Drywall screws OR Velcro strips — Use the Velcro strips if you want a renter-friendly version (no hole in the wall).
- Tape measure
Shop the look
The pieces that finish this nook — mirror, bench, baskets, and more — live in my home shop.
Shop My Home →How to build a vertical wood slat wall, step by step
The whole build comes down to five steps: figure out how many boards you need, cut them, stain them, assemble the panel on the floor, and mount it to the wall. Here’s exactly how I did it.
Step 1: Determine how many 1x2s you’ll need
For this step, we’re going to do a little math to determine how many 1x2s you’ll need. It’s important to note that since we’re using 1x2s, the actual measurement for the boards we’ll be working with is 3/4″ x 1 1/2″.
First, add the width of the board to the width of the spacer you’ll be using. This is the amount of space that will be between each wood slat. Since we’ll be using the depth of the boards as the spacer, we use 3/4″ in our equation — but you can use any distance you’d like.
board width (in) + length of your spacer (in) = x
(1.5″) + (.75″) = 2.25
Next, measure the size of the wall you plan to cover (my wall is 30.75″) and divide that by x. Round your answer to the nearest whole number.
wall width (in.) / x = # of boards
(30.75″) / (2.25″) = (13.6) = 14 wood slats
You’ll also want to add the appropriate number of 1x2s to account for the support boards. You’ll need enough to cover the width of the wall twice — one support board at the top and one at the bottom. For my wall, I only needed one additional board, so in total I used 15 1x2s.
Step 2: Cut the 1x2s to size

This step should be fairly simple. Depending on the height of your wall, you’ll need to cut the 8-foot-long 1x2s to size. Home Depot normally cuts wood for free; unfortunately, in my experience, if the length you need cut off is smaller than 4 feet long, they won’t do it and you’ll have to cut them on your own.
But don’t worry — this small circular saw is great for small pieces of board like the 1x2s if you don’t have access to a chop saw. You can buy one off Amazon for around $50 or rent one from Home Depot. Don’t forget to cut your support boards to size as well, and set them aside, separate from the 1x2s that will be installed vertically.
Step 3: Stain or paint

If you’re planning on staining your 1x2s, I recommend using a stain + polyurethane to make the process go a little faster. Choose your stain color and apply it with a rag. (Don’t forget to wear gloves!) Let them dry completely.
While the vertical slats are drying, paint your support boards the same color as your wall. This ensures that the support boards blend with the wall and aren’t easily seen through the spaces. But, of course, you can paint these any color you’d like!
Step 4: Attach the 1x2s to the support boards
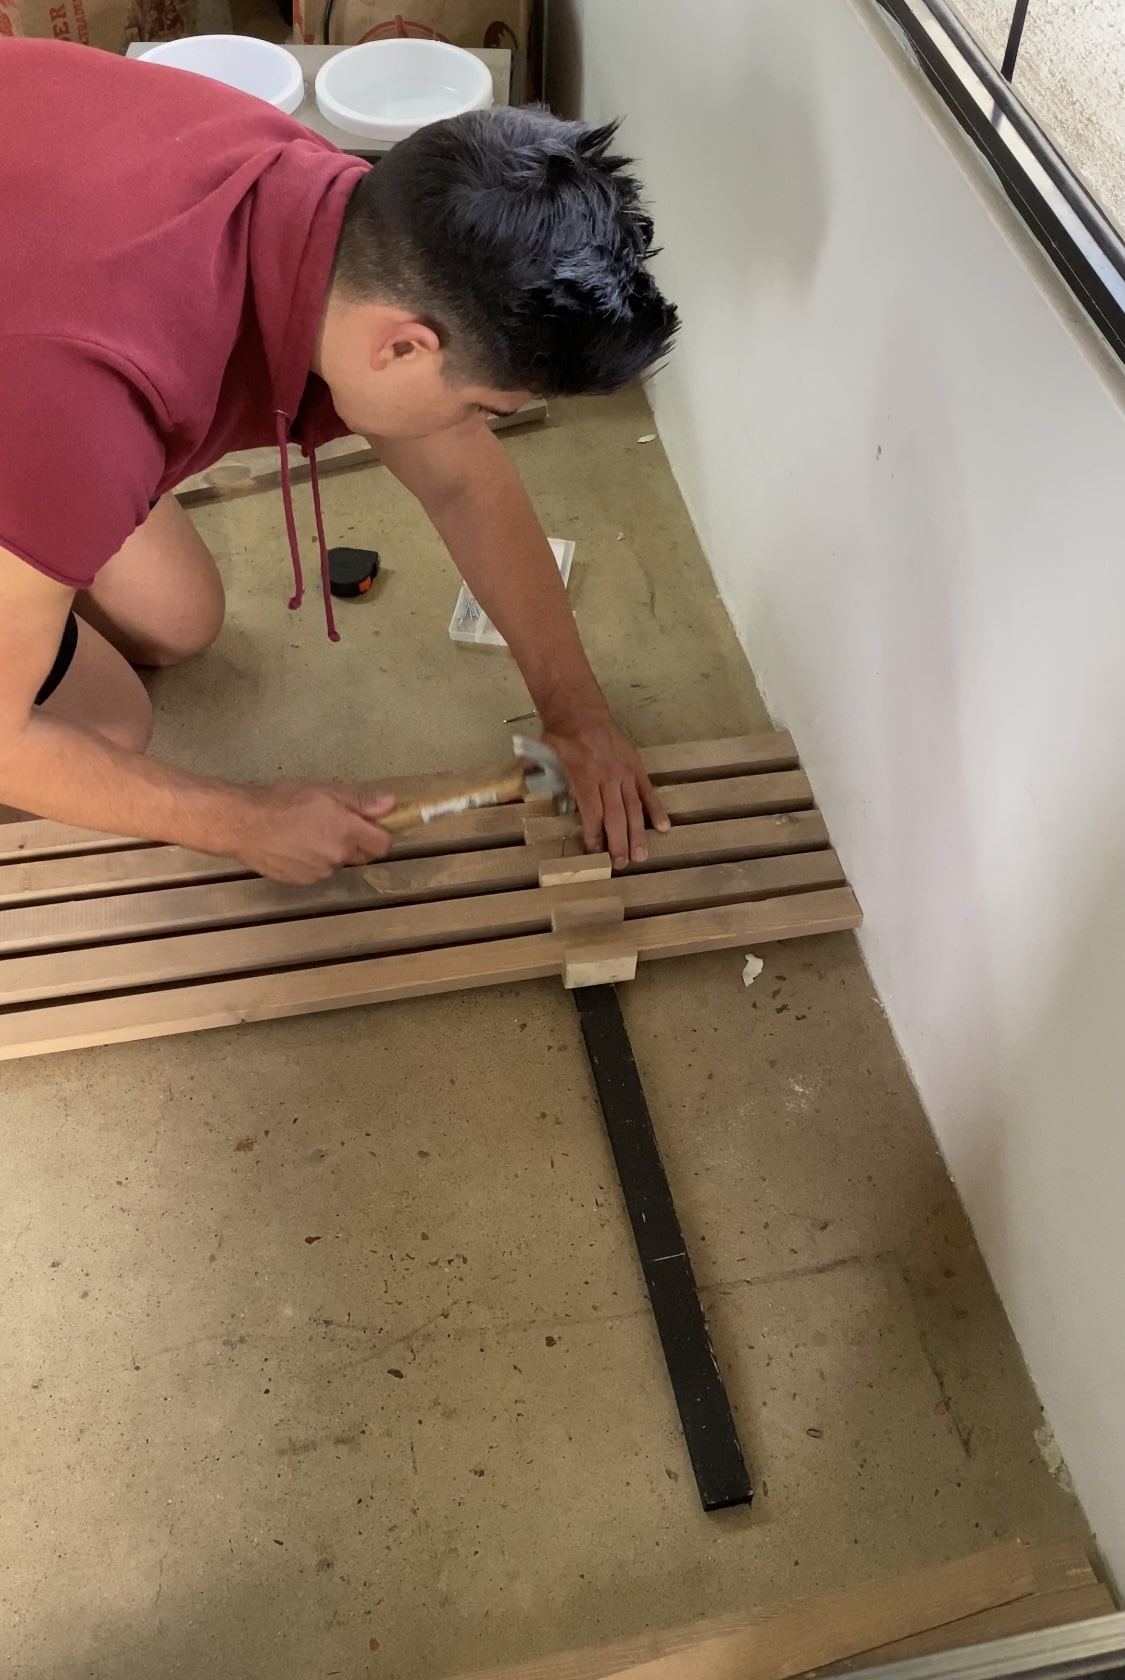
The most effective way to attach the vertical wood slats to the support boards is to use a wall to make sure every board is perfectly aligned. Here’s how to attach the boards.


- Lay your support boards on the floor, parallel to the wall.
- Lay the vertical wood slats on top of and perpendicular to the support boards.
- Adjust the support boards to sit along the top and bottom foot of the vertical boards. Measure the distance of each side relative to the wall to ensure they are even.
- Place the spacers between each board on the top and bottom, over the support boards, and pull them close together to ensure each board is pressed firmly against the spacer. Hammer one nail through the vertical wood slat into the support board. Secure 3–4 boards on the top, then secure the bottoms, ensuring that the bottom support board is level.
- Once these starting boards are secured, repeat the same process on the opposite side of the support board. Be sure to measure the ends of the support boards a second time. Basically, we want to be working from the outside inward to confirm each side is even and level to the wall.
- Once both sides have a few boards secured to the support beam, nail in the remaining boards using the spacers. Remove the spacers once all boards have been nailed into the top and bottom support beam.
Step 5: Secure the wood slats to the wall

The final step is surprisingly simple. You will likely need a second person to help you place it onto the wall properly. If you’re interested in a good chuckle and some relatable couple’s humor, I shared a TikTok of my experience with my husband.
Place the assembled slats onto the wall and get it into position. At this point, you can either use drywall screws to attach it to the wall or a long strip of Velcro. Velcro is more of a renter-friendly, damage-free option. If you’re installing with screws, be sure to screw into the support board (in between the vertical slats) so it isn’t visible. Attach it on the top and the bottom support boards.
What does the finished wood slat wall look like?
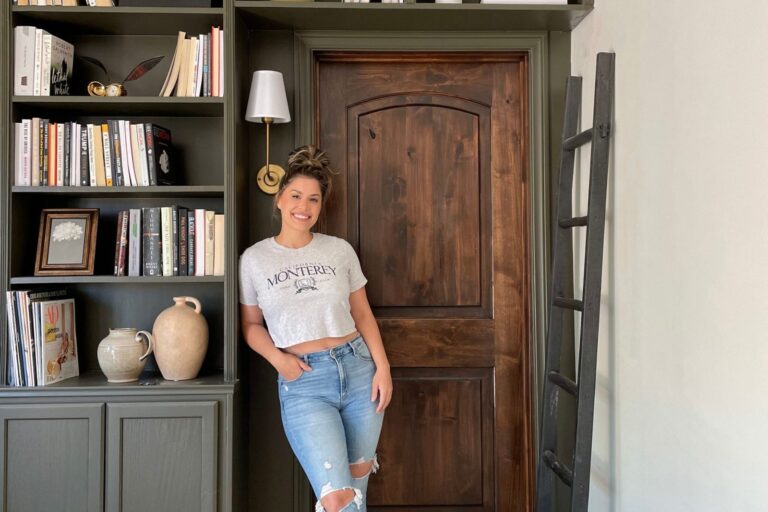
Once it’s up and styled, the whole nook reads like it was always meant to be there. We styled ours with a leaning mirror, a gold picture light, and a bench — the same warm, lived-in feeling we chased in our full entryway makeover. If you want a statement mirror like this one, here’s our DIY Anthropologie-style mirror.

That gold mirror and picture light are the details that make it feel finished — the slat wall is the backdrop, and the styling is what makes it a moment. If you love this kind of warm, stained-wood detail, our wood panel kitchen shelves use the same approach.

How much does a wood slat wall cost?
This is one of the most budget-friendly accent walls you can build, because almost all of the cost is in the boards. For my wall I used 15 1x2x8 common boards — and 1x2x8 boards typically run only a few dollars each at Home Depot or Lowe’s.
Add a can of stain, a box of thin penny nails, and either drywall screws or Velcro strips, and the materials stay modest. Building from individual boards like this costs a fraction of pre-made acoustic slat panels, which is exactly why it’s worth the little bit of math in Step 1.
Shop the finished look
The mirror, picture light, bench, and styling pieces are all linked in my home shop.
Shop My Home →Wood slat wall FAQ
How many 1x2 boards do you need for a slat wall?
Add the width of one board to the width of your spacer, then divide your wall width by that number. For my 30.75-inch wall with a 0.75-inch spacer, that came to 14 slats, plus one extra board cut down for the top and bottom support pieces — 15 boards total.
What wood is best for a DIY wood slat wall?
Inexpensive 1x2 common boards (often pine) are the easiest and most affordable option, and they take stain beautifully. You can step up to a hardwood like poplar or oak if you want a smoother grain, but standard 1x2s keep the project budget-friendly.
How do you space the slats evenly?
Use the offcuts from your boards as spacer blocks. Set a spacer between each slat at the top and bottom before you nail it down, then pull each board firmly against the spacer. Remove the spacers once every board is nailed in. This keeps every gap identical without measuring each one.
Can you install a wood slat wall without damaging the wall?
Yes. Instead of drywall screws, mount the assembled panel with heavy-duty Velcro strips along the top and bottom support boards. It’s a renter-friendly, damage-free option that leaves no holes in the wall.
Is a vertical or horizontal slat wall better?
It depends on the room. Vertical slats draw the eye upward and make ceilings feel taller, which is ideal for entryways and standard-height rooms like ours. Horizontal slats draw the eye sideways and make narrow or long spaces feel wider.
How long does it take to build a wood slat wall?
The build itself takes about two hours from start to finish, not including drying time for the stain. Staining and letting the slats dry completely is the part that adds time, so plan to stain ahead.


How to Make Homemade Ice Cream
Make homemade ice cream with clean, simple ingredients and no refined sugar. The creamy custard science, every ice cream maker method, mix-ins, and easy swaps.
5 Interior Design Tips For Beginners
If you’ve ever struggled with how to decorate your home, here are 5 simple and approachable interior design tips for beginners.