

The Collected Gallery Wall: How To Make Your Art Look Curated, Not Coordinated
Design & Styling The Collected Gallery Wall: How To Make Your Art Look Curated, Not Coordinated By Liz Lovery · Updated August 24, 2026 The

DIY & Tutorials

Quick Answer
The IKEA Alex Drawers DIY transforms a basic IKEA Alex unit into a custom-looking dresser by adding wood trim to the drawer fronts, caulking and filling the seams, painting the entire piece, and swapping the original hardware for upgraded pulls. The project takes a weekend, costs around $30 in materials (if you already own basic tools), and works on both the 5-drawer and 9-drawer Alex units.
One of the biggest reasons people love IKEA is the price tag. When you're working with a budget — first apartment, growing family, fixer-upper drowning in projects — IKEA gets you a real piece of furniture for the cost of a nice dinner out. But the trade-off is usually finish. Budget-friendly and detailed don't tend to live in the same drawer unit.
The IKEA Alex Drawers are a perfect example. They're functional, they're affordable, they hold a ridiculous amount of stuff. They also look exactly like what they are: flat-front drawers with a builder-grade finish. So I set out to change that.
This IKEA Alex Drawers DIY is the one I've come back to again and again — for our office, for a guest room, for the desk setup I'm still using today. It takes a weekend, costs about $30 in materials, and turns a $130 IKEA unit into something that actually looks like it belongs in a designed room. Here's exactly how I do it, step by step.
The IKEA Alex Drawers DIY is a furniture hack that takes the standard IKEA Alex drawer unit and dresses it up to look like a custom-built piece. The transformation comes down to four moves: adding mitered wood trim around each drawer front for a paneled look, sealing the seams with caulk and wood filler so the trim reads as built-in, painting the whole piece in the finish of your choice, and replacing the factory hardware with something that has more weight to it.
What I love about this project is how forgiving it is. You don't need a workshop or a table saw. A miter box from the hardware store and a basic power drill will get you through it. And once it's done, nobody guesses it started as an IKEA piece.

The materials list is short and most of it lives in the hardware aisle at Home Depot or Lowe's. If you already have a few basic tools at home, your out-of-pocket cost for this IKEA Alex Drawers DIY comes in around $30 — the bulk of it being the wood hobby boards and your new hardware.
One note before you shop: the IKEA Alex has two different drawer sizes within the same unit — the top drawers are shallower than the bottom ones. Measure each drawer individually before cutting boards. I learned that one the hard way.
Here's how to complete the IKEA Alex Drawers DIY from start to finish. The whole project takes a weekend if you're working steadily, with most of the time being dry-time between coats. Plan for two days minimum if you want everything fully cured before you load it back up with stuff.

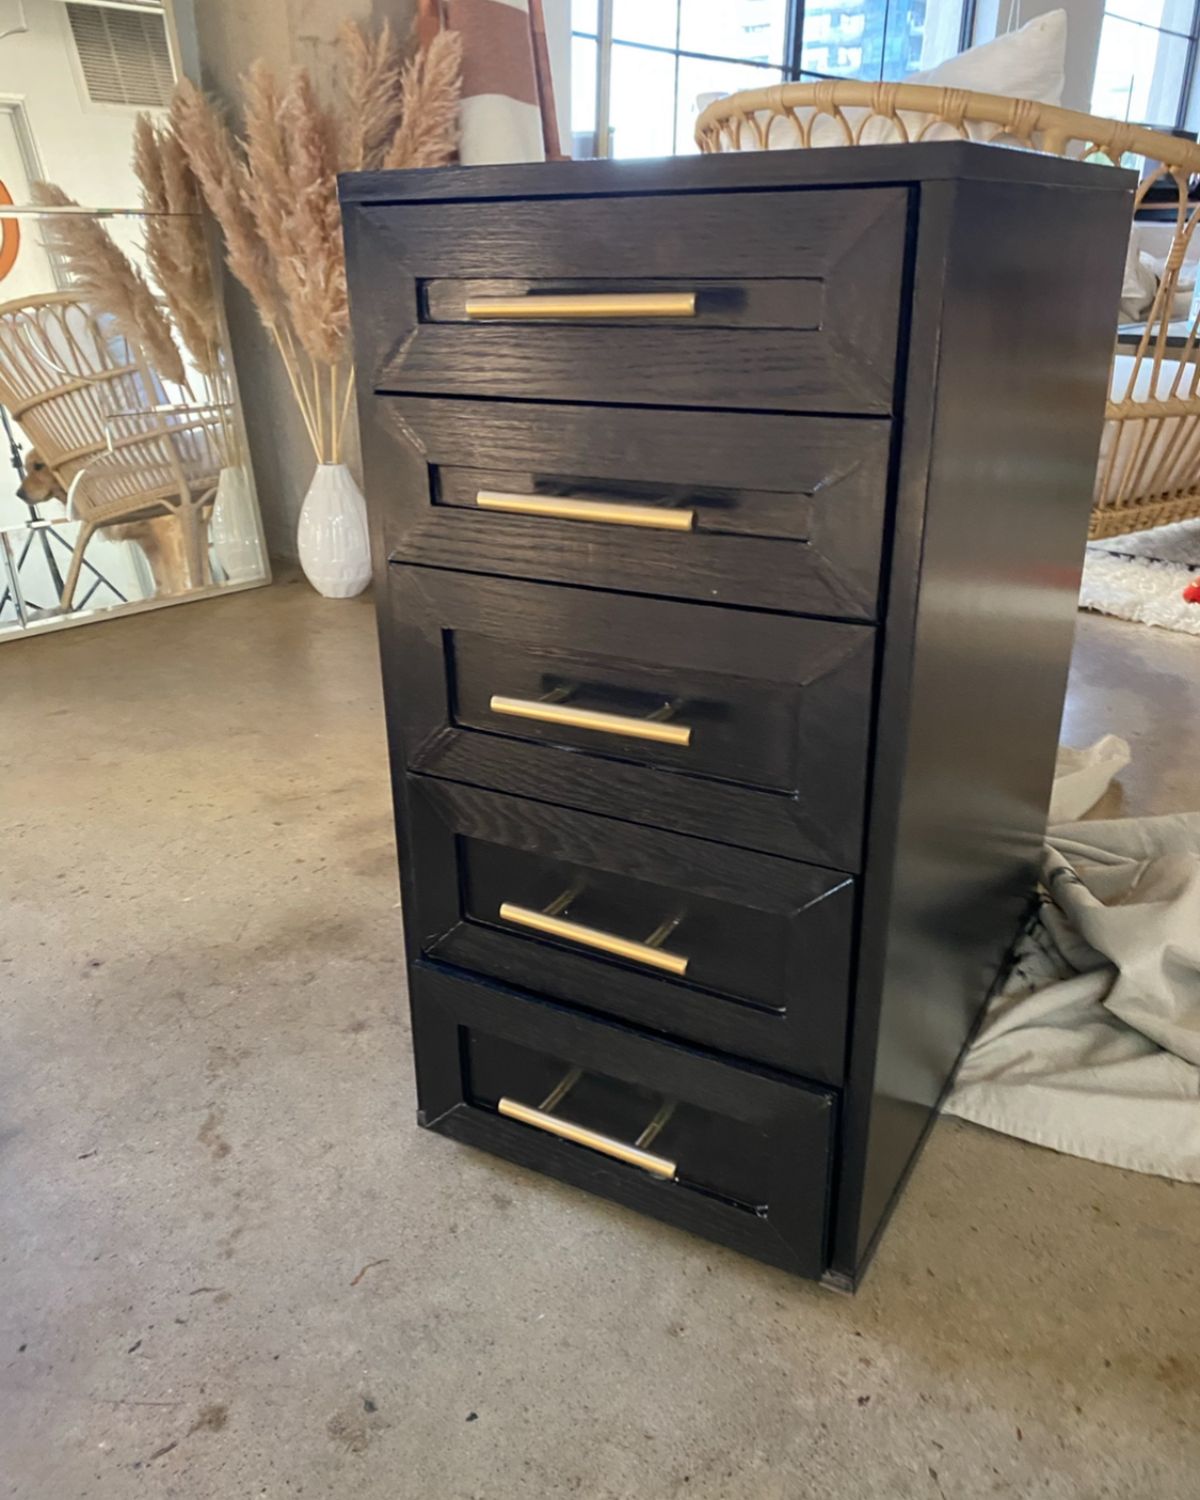
The hobby boards create the outlined trim effect on the drawer fronts. To get that paneled, picture-frame look, every corner needs to meet at a clean 45-degree angle. Use your miter box to cut each piece to length, with the angles facing inward.
Like I mentioned — the Alex has two different drawer sizes in the same unit, so be careful not to mix up your cuts. Lay your pieces out on each drawer front before you glue anything down. If something looks off, this is the moment to recut.
Once your boards are cut and laid out, set them aside and turn your attention to the drawer fronts. Use 80-grit sandpaper to rough up the factory finish so your paint has something to grip.
How much you sand depends on your paint color. I planned to paint mine black, so I didn't strip the original coating completely — I just scuffed it. If you're going lighter, take more of the top coat off so the original color doesn't bleed through. An orbital sander makes quick work of this if you have one.


This is the step that turns a flat drawer into a paneled one. Apply wood glue to the back of each cut hobby board and press it into place on the drawer front. Use metal clamps to hold the trim down while it dries.
Work on one drawer at a time and let it dry fully before moving to the next. The miter box I'm using also doubles as a stand to keep the drawer propped open and stable while the clamps do their work — saves you from balancing things on the floor. Make sure each trim piece sits flush with the edges of the drawer and that the mitered corners meet cleanly. Wipe any glue squeeze-out with a damp paper towel before it sets. Roughly one hour of dry time per drawer.
This step is optional, and only matters if you're updating existing hardware rather than buying new. If you bought brand-new pulls, skip ahead.
If you're refinishing what you have, now's the moment. I spray-painted my original hardware with Rust-Oleum Metallic Gold to get that warm brass look without the brass price tag. Let everything dry completely before you handle the pieces again — fresh spray paint is deceptively easy to smudge.


This is the step that separates a DIY that looks like a DIY from one that looks built-in. Run a thin line of paintable caulk along the inside edge of each trim piece where it meets the drawer front. Smooth it out by dragging a damp finger (or a clean coin) along the bead. Wipe away any excess so the line stays crisp.
For the corners where the mitered pieces meet, you can either work caulk into the seam or use wood filler — both will paint over cleanly. Let everything dry fully before you sand, about 1–2 hours.
Once the caulk and filler are dry, give the whole piece another sanding with 220-grit sandpaper — the trim, the drawer fronts, the body of the dresser. This smooths out any rough caulk lines and evens out the surface so your paint goes on cleanly.
If you're using a separate primer, apply it now and let it dry completely before moving on. If you're using a paint-and-primer-in-one, you can skip this and dive into Step 7.

The fun part. I'd normally recommend a satin finish for furniture — it has just enough sheen to feel polished but doesn't get glaring under direct light. I used what I had on hand for mine, which was a semi-gloss, and it still turned out beautifully. The right finish really depends on where the piece is going to live and how much it needs to take.
Two thin coats is better than one thick one. Let the first coat dry fully before applying the second — usually a couple of hours, but check your paint can for specifics. Take your time around the trim edges so the paint settles in cleanly without pooling.


Once the paint is fully dry, it's time to mount your hardware. Place each pull where you want it to sit on the drawer front and mark your pilot holes with a pencil. Drill the holes — your bit size will depend on the screws that came with your hardware. Then attach the pulls and tighten.
If you're working with longer pulls or anything more substantial than the original IKEA hardware, measure twice. Drilling new holes through a freshly painted finish doesn't leave room for error.
Here's the finished piece in the room it landed in. The IKEA Alex Drawers DIY ended up sitting next to a desk I'd snagged on Amazon for $90 (the full-price version is still under $140), and the two together look like a built-in setup. The trim detail catches the light differently than a flat front would, and the brass pulls warm up the black so the whole thing feels intentional rather than utilitarian.
The full project came in under $30 in materials and turned a $130 IKEA piece into one that reads as a custom design choice. That's the kind of math I love.
If you already own the basic tools — a miter box, drill, sander, clamps — your out-of-pocket cost for the IKEA Alex Drawers DIY itself comes in around $30. That covers the hobby boards, wood glue, caulk, wood filler, and a small amount of paint and primer.
If you're starting from zero and need to buy everything, plan for closer to $80–$100, with the bulk of that being one-time tool purchases you'll use on every project after this. Hardware can range anywhere from $20 to $60+ depending on what you choose — that's the easiest place to scale the budget up or down.
The IKEA Alex itself runs around $130–$160 depending on the size and finish. So all-in, even buying everything new, you're looking at a custom-looking dresser for under $250.
The IKEA Alex Drawers DIY takes about a weekend from start to finish. Most of the time is dry time between glue, caulk, and paint coats. Hands-on work is probably four to six hours total.
A satin or semi-gloss latex paint with built-in primer works best on IKEA furniture. The factory finish is slick, so a paint that bonds well is essential. Sand the surface first with 80-grit sandpaper to give the paint something to grip.
Yes — you should sand IKEA Alex Drawers before painting. The factory finish is too smooth for paint to adhere well on its own. Use 80-grit sandpaper to scuff the surface, then 220-grit to smooth it before your final coat.
You can complete the IKEA Alex Drawers DIY with mostly hand tools — a miter box and hand saw replace the table saw, and the clamps and sanding can be done manually. The only step that genuinely needs power is drilling holes for the new hardware. A basic cordless drill handles it.
Yes, the same technique works on other flat-front IKEA dressers like the Malm, Hemnes, and Kullen. The only thing that changes is the size of the trim cuts. Measure each drawer individually before you cut, since IKEA pieces often have varied drawer sizes within the same unit.
The IKEA Alex Drawers DIY costs around $30 in materials if you already own basic tools. The IKEA Alex unit itself runs $130–$160, and replacement hardware ranges from $20 to $60+ depending on what you choose.

Design & Styling The Collected Gallery Wall: How To Make Your Art Look Curated, Not Coordinated By Liz Lovery · Updated August 24, 2026 The
The real plants that grow in full shade, the faux ones that actually look convincing, and how to style both on a front porch that gets almost no sun.

Renovations The Paisley Project: transforming a neglected 1961 California ranch into a timeless family home